Scott Pilgrim Vs The World - 2010 (Universal Pictures) Scott Pilgrim uses a lot of VFX to portray the Computer Game feel that was prevalent throughout the comic series it is based on, by Bryan Lee O'Malley. Double negative handled the majority of the combat and on screen effects The scene where Ramona Flowers is skating through the snow and the snow is melting as she skates over it, the clean plate had an area of no snow where she would skate. The snow was added digitally with spray simulated for where he skates were. Additionally, the roofs of the houses had no snow on them, but with the scene taking place the morning after a snow storm, they added snow digitally. In the Matthew Pattel fight, Pattel was filmed on a blue screen in a harness, as a lot of his fighting is the manga-style mid air combat. This also allows him to be shot through the air in all manner of crazy spins that would not be possible otherwise. Physical lights were in place for the connection of hits which would emphasise the combat. Triggers would be placed on set which the actors would punch. This would ensure the timing would be perfect. These were composited out. In the final composite put together by Ian Copeland there are Handrawn flash frames during the impact flashes, these were provided by Oscar Wright, the film’s concept designer. In another action shot Patel runs across the stage at Scott during which the proportions of the room stretch and distort as they do in Manga animation, in the finished shot the camera appears locked to Patel’s legs as he runs. To achieve this "we shot Patel on a blue jogging treadmill to capture a “camera locked” aspect on his running legs, we then shot Scott, Kim, Stephen and Johnny stills on the Rockit set with a dolly move ."
Fighting Lucas Lee and his stuntmen required a CG smashing skateboard, comic book style animated impact graphics and visualised sound effects were all added in the final comp. Scott and Lee continue to face off in a Manga-like fight featuring zooms lines and a digital contra zoom, achieved by shooting tracking plates on set, slow-motion plates of the actors running on bluescreen and the addition of CG environments, 2D graphic sound effects, hand-drawn speed lines and flare elements.
The Lucas Lee Skateboard Scene. The final sequence has matte paintings of the Toronto skyline, CG steps, CG trees, CG snow flurries, CG sparks, lens flare elements, 2D graphics, bluescreen stunt performers, bluescreen actors, CG coin explosions, CG & photographic smoke elements. Chantelle Williams created the CG environment using Maya and Renderman. Steve Tizzard oversaw the creation and compositing of the action sequence
Digital Doubles are used when Scott is upper cutted by the Vegan Superman, Todd Ingram. The model used is not very detailed, only having similar clothes placed on it, as the shot is so quick and you don't see Cera's face. The same is used for the impact in the bin bags. The next shot shows a beaten and bruised Michael Cera in the trash.
I will review the VFX process of one of my favourite films in recent years. First up, Tron Legacy - 2010 (Walt Disney Studios) The visual effects team had worked on Tron Legacy for about 2 years, but surprisingly, a lot of what you may think are VFX are really practical effects. A lot of the sets were built physically with the help of the director, Joseph Kosinski, who has a background in architecture. Even the costumes with the lights were created. Elements of the film that were created digitally are the establishing shots, which were based around Japanese landscape art, some of the background scenery and the Recognizer - the flying vehicle.
It took two years and ten companies to create the 1,565 visual effects shots of Tron: Legacy. The majority of the effects were done by Digital Domain, who created 882 shots under supervisor Eric Barba.The production team blended several special effect techniques, such as chroma keying, to allow more freedom in creating effects. Similar to Tron, this approach was seen as pushing the boundaries of modern technology. Rather than utilizing makeup tactics, such as the ones used in A Beautiful Mind, to give Jeff Bridges a younger appearance, the character of Clu was completely computer generated. To show that this version of Clu was created some time after the events of the original film, the visual effects artists based his appearance on how Bridges looked in Against All Odds, released two years after Tron. The effects team hired makeup artist Rick Baker to construct a molded likeness of a younger Bridges head to serve as their basis for their CG work. But soon, they scrapped the mould because they wished for it to be more youthful. There was no time to make another mould, so the team reconstructed it digitally. On-set, first Bridges would perform, being then followed by stunt double John Reardon who would mimic his actions. Reardon's head was replaced on post-production with the digital version of the young Bridges. Barba – who was involved in a similar experience for The Curious Case of Benjamin Button — stated that they used four microcameras with infrared sensors to capture all 134 dots on Bridges face that would be the basis of the facial movements, a similar process that was used in Avatar. It took over two years to not only create the likeness of Clu, but also the character's movements (such as muscle movement). Bridges called the experience surreal and said it was "Just like the first Tron, but for real!"
Bradley Munkowitz of Digital Domain recorded himself working on a Unix terminal doing "technologically feasible things".
He didn't want the "hacker scenes" to be bogged down with the Hollywood idea of hacking, as nmap had been used to death since it's first appearance in The Matrix, which then found it's way into Bourne Ultimatum, Die Hard 4, Battle Royale and so on. He said, "In Tron, the hacker was not supposed to be snooping around on a network; he was supposed to kill a process."
He used posix kill and piped PS into Grep. Using emacs eshell to make the terminal into a more "1337" style. The editor was split into nested panes and ran different modes.
In the battle arena scenes, the scoreboard was created using a line-generator which produces bursts of lines, which would turn at adjustable angles. The Radial Mode arranged the geometry in concentric circles. This would be used in a few different elements.
The design above and then in use in the scene.
Fireworks were simulated where a particle was given an upward force from generation. Gravity would pull it back down, resulting in a parabola (a two-dimensional, mirror-symmetrical curve, which is approximately U-shaped when oriented)
Particle children would be added as well as artistic styles, including what the team called "Egyptian", which is a side-stepping behaviour. This was done to give the fireworks a real firework feel, but also to give it a techno-aesthetic, so it would look as though it would belong in the world of Tron. As an homage to the original Tron, they had the fireworks explode in the shape of the character Bit.
Above is the final result of the Digital Visual Effects project. We recreated a scene from the Gareth Edwards film, Monsters. In the scene, a monster picks up a car and tosses it aside. The reason we chose this sequence is because we wanted to attempt to make a visual effect sequence at night, as it is host to numerous challenges. One of the main challenges found was in the lighting on the 3D model and matching as close as possible to the real world car which it was to replace in the scene. The real world car had reflections which we were not able to recreate in the 3D model, something we have said that if we were able to shoot again, the cars would be parked further apart. We weren't able to shoot again because the car we needed was unavailable, as it was one of Phil Baggot's friend's cars and they were not available after the initial shoot. Colour matching the vehicle at night also proved difficult, which ties in with the light matching. This made it a lot harder to have the 3D car blend seamlessly with the real car for the shot, as it was in one single shot, like how Edwards had done his. Using a focus pull onto the driver of the camera car, the car in front blurs out. The second before the car is lifted, the 3D model is placed into the scene, then the focus shifts back to it. Having watched the scene so many times, we were able to find the exact moment the car was switched. This was crucial. We even noticed that the 3D model only has a vague resemblance to the real one.
IN THE BEGINNING OF THE PROJECT:
When we formed our group, Shaun, Phil and I decided we would go and choose a few different sequences we would like to recreate and look at how they were made. We would then look at them all and see which we thought would be the best and most interesting to try. We opted for Gareth Edwards' monster film, Monsters. What really attracted us to this film was the way Gareth had made the film. It was done with very few people and he edited and composited the film himself with Adobe After Effects, a program we have access to, so we could get a very authentic edit of the film. Also, the monster rig he used was a modified Spider CAT rig in 3Ds Max. He simulated the tentacles with Reactor, however. This meant we could not use a modern version of 3Ds Max.
We worked out a work flow for what we would be making;
Offline editing
Taking BMD flat Log convert to Prores/DNxHD
Linear workflow
Mulitpass compositing including Zdepth
CGI will be rendered in OpenEXR
Planar Tracking
And we took a look at what problems we may run into:
Noise, Rolling Shutter, Difficult shot and the shooting style.
Noise:
The noise is able to throw off the tracking of shots. Noise is especially prevalent in dark shots, which is what our sequence is. If we raise the ISO to give ourselves a brighter shot, we are going to open ourselves up to more noise, so we have to be very careful and shoot on a lower ISO. Noise is always going to be there, but we can remove that in post. At the end of the sequence, however, we will add noise. This will keep the CG elements looking like they belong in the scene.
Rolling Shutter:
Unless the camera has Global Shutter, you will be dealing with this. The sensor scans from top to bottom, meaning that if the camera is moving side to side, your image is going to be skewed, like this: \
For our shot, however, we don't have to worry so much about this, as the majority of the shot will be steadied.
Shooting Style:
We will be avoiding the Shaky Cam/Handheld feel by having the camera stabilised. This would remove the time needed to correct the footage later.
Difficult Shot:
Shooting at night is not ideal. With issues from Noise and high ISOs, to needed good lighting to just see ANYTHING. But what was going to be a real problem was that there are no tutorials to help us with this effect. We have to watch the sequence frame by frame to see when things change, how things change, why he changes it there.
We split the project into sections and worked out who would be working on what parts.
I was tasked with creating the Monster rig - having it ready to attach the tentacles that Shaun was going to make, animating it for the pickup, and animating the car being picked up. Phil would handle the car being thrown aside. I would also have a look at simulations for fog. My skills with Maya were not up to scratch, however and I was unable to make a suitable fog effect.
We also looked at locations.
A good spot for the night shot was this area of Ash Road. It is near where Phil lives and he said that at night, the spot would be perfect, as the street lights are far enough away to not be a problem and the trees blocked the lights from the main road behind. Sadly, shortly after choosing this spot, the council had cut the trees down.
Near me, we found this little area. There were no lights, far enough away from the Ringroad... It seemed perfect!
But the area is fenced off, so we couldn't get cars there.
Shaun suggested Danby Forrest. The problem here is that it's in the middle of nowhere and getting to it would be a pain.
Another possible location I found was Roundhay Park. There are plenty of trees in the area and reasonable access to them by road.
In the end, we opted for none of these and found a spot on Headingley Campus, which leads towards the student halls. There are a lot of trees and no street lights.
CREATING THE MONSTER:
Gareth Edwards made his monster's rig using 3Ds Max's CAT system. To be true to the film, we decided that's what we would do, too.
Loading up a SPIDER CAT rig and deleting the pedipalps and some of the legs, then adding to them with extra bones was how I would end up making the beast. Aligning the legs into roughly how the monster should have it's legs was a tricky feat. If they weren't right, the movement would be too lopsided or rigid. Getting the right number of bones in the legs would give you the right bend in the legs for when the monster stoops down to pick up the car, then stand back up. Too many bones and it would stoop too low, too few bones and it would look like it was moving on stilts, not being able to bend right and making for awkward movements. It was trial and error to get the rig right. But with how Shaun had got the tentacles simulated and skinned, it was worth the effort.
The standard 3 bone legs did not give a good enough arc in the movement, something which would severely affect the animation.
I did find, however, that 5 bones would make for a nice arcing movement.
To animate the car being lifted, I would require Shaun's tentacles to be added to the rig, and Phil to have modelled the car. Once these were done, I would match the movement of the car to the movement of the tentacles. The car lift and the tentacles would be rendered separately, as the version that the car was modelled and textured in would not carry across to the previous version which the car was made in. This was a part of our workflow which we had taken into account and were ready for.
Once the car was rendered out in passes, it was ready to be added into the scene along with the tentacles.
SIMULATION:
These were left out, as I was not able to get the fog to react properly. The result was just like thin smoke coming from an emitter. I tried to keyframe the fuel rate in Maya to change the rate that the fog was being created, but in the end, we had to accept defeat. This also was a problem for the dirt hits when the car hits the ground after being picked up by the monster. In the end, we had to resort to a Dirt Charge from Action Essentials. Action Essentials was only to be a last ditch effort, as we wanted to create our elements, ourselves.
When I tried to make the fog and dirt charges, I was using a simulation I had used for another project as a reference as to how to make it.
Explosion Simulation that I made in Maya for the Animation and Simulation module.
I had been able to change the rate the fuel was used, which would stop emitting smoke after a certain amount of time. I could not recreate this with the fog, however.
EDITING:
Shaun, Phil and I each took turns in editing sections of the video. I mainly roto'd out sections to allow the tentacles to pass behind the driver and passenger. I would remove the hard edge of the mask by feathering the edge. This would blend the clips together in a more realistic fashion, allowing the features to effectively bleed into eachother, giving you a slight overlap in colours, assisting in blurring the images. Part of the car landing shot I masked, too. The car rolling into shot would roll in front of the wing mirror, so I masked over it to keep the car outside. I also added Motion Blur to the car as it was picked up. Motion Blur is needed to make elements look realistic. Everything that moves is blurred. It's just how our eyes see things, so if you don't add the Motion Blur, it will stand out really obviously. The down side to adding Motion Blur is that it ups Render times a lot, especially in our scene, where you had multiple objects being blurred, ie, the tentacles and the car.
We used a Gaussian Blur on the car and tentacles for the pulled focus shots and keyframed it so it would match the focus of the footage. We kept a slight blur on the objects because, like with the motion blur, the eye always has some blur to what it sees. By adding the blur to the CG objects, it allows us to keep them fitting in with the scene.
I also added some film grain to the footage at the end, since we had removed grain from the original footage, we could add grain at the end which would include the CG elements.
I managed to get my Performance Capture project completed!
Acted by myself (The final sequence) and Richard Nash. The male character is completely Key Frame animated, using my own actions and the Motion Capture footage as reference.
A collection of photos from the various attempts at getting our footage.
A couple videos James Ruston (http://foreverrendering.wordpress.com/author/foreverrendering/) shot during one of the sessions. MAY REQUIRE A FACEBOOK ACCOUNT
We had a lot of trouble getting our footage, but we finally figured out why... We had been adding a new solver each time we filmed a take. This was bogging down the system and making it crash. Once we fixed that issue, we were able to get our footage no problem. James and I even went as far as shooting some extra takes to work on over the Summer, so be sure to check back for those!
In Motionbuilder, I blended the clips together which would allow model to act out all of the clips in what looks like one go.
The can had a constraint added to it, which would keep it linked to the character's hand for as long as the constraint was active in the timeline.
I found a couple free models online and used them, rather than the Aragor and Maya models. I wanted the characters to look like they were in a dance hall or a club. I was not able to find any suitable scenes to use in Motionbuilder, and time was not on my side to be able to model one.
The keyframe character, I wanted to look quite cocky and "Hey, look at me!" so his walk was very pelvis first, making his weight have to rotate around his hips. This was something I had picked up in the Animator's Survival Kit.
I will be maintaining this post with my how-to guide to simulating explosions in Maya.
But as a point of reference, this Youtube is an unbelievably excellent resource of real-world examples, from pressurised gas explosions, incendiary and fragmentation explosives and even petroleum explosives (from about 8 minutes onwards there are some insane explosions in fuel depots showing the incredible rate that fuel is consumed and how fast the explosion expands). VIDEOS OF EXPLOSIONS ON YOUTUBE
Digital Tutors trailer for Petrol explosions. The full tutorial gives you an in depth look at how real explosives work, with regards to fuel consumption, incandescence and pressure. Digital Tutors Trailer
Battlefield 4 makes excellent use of particle simulations throughout the game. The buildings as they crumble and collapse, throwing out debris and smoke as they fall, the hard cover being gradually chipped away from high calibre weapon fire, the muzzle flashes and gun smoke themselves are fantastically made. Rockets colliding with vehicles, the smoke wrapping around them as they move, and the atmospherics themselves. DICE really broke the mould with their physics engine Frostbite2, which makes all of these simulations masterpieces in themselves. A compilation of them follow; Battlefield 4
Grand Theft Auto 5, another recent game which contains more fantastic explosions, smoke, dust, particles and cloth simulations. Rockstar really know how to go above and beyond with their detail. Just look at the final couple clips in the third trailer for the game! Grand Theft Auto 5 - Trailer 3
Maya Explosions - Maya is an insanely powerful program for simulating with. Once you get your head around it, it begins to just click with you. The water, fire and explosions (particles with an emitter) are just so good in Maya and just overshadow Max and the limited simulations it can make right out of the box without any plugins. THIS VIDEO was created by Kyle Jones, a Youtube User, using Maya. My explosion is made similarly, but by looking at how the explosion would react with the fuel, give out heat, which would ignite it's fuel source, the pressure given off by the explosion itself and the way the smoke cloud would dissipate, I managed to make mine look a little more, without sounding overly harsh on his very good work, convincing. Where he has left an emitter giving off smoke, it is a little too dense, and the "chunks" given off move too slow for the pressure that would have been given off by the explosion. These are elements that need to be observed to create a convincing explosive simulation.
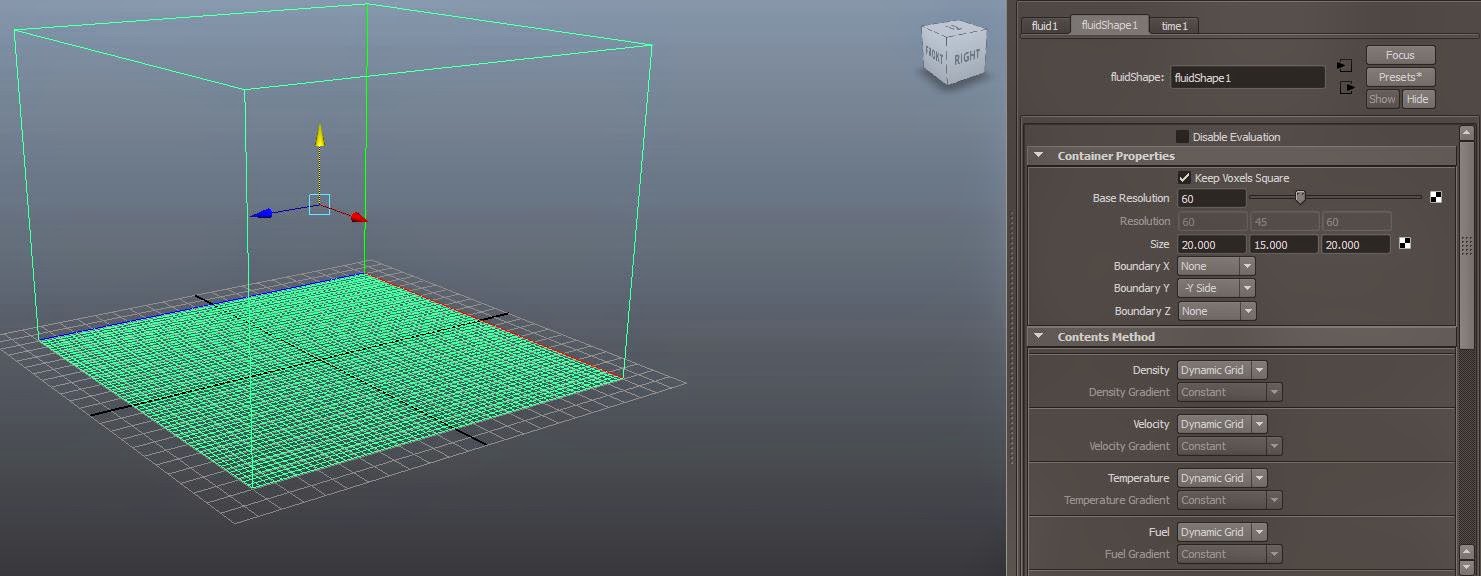
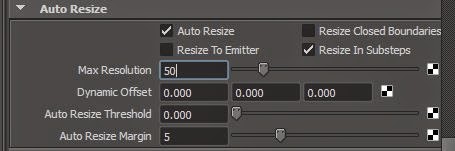
CREATING THE EXPLOSION. I have shown key settings to create the explosion I used. Some screen shots I have annotated. Later I may come back and do a write up for these, but at the moment, I have no time. Projects are calling me!